Pre-Event
- Invite guests – Use your Cherry dashboard and other internal systems to find attendees.
- Quality over quantity – Start with your warmest leads, such as patients due for a follow-up treatment, VIP members, returning patients, previous consults who didn’t book, and social media inquiries.
- Set goals – Set an overall sales goal for the event and for each employee.
- Give patients a reason to buy – Special offers, buy one, get one (BOGO), or a gift with a purchase.
- Promote, promote, promote – Email, social media, text/call reminders, and in-office flyers leading up to the event are great places to promote your event.
- Raffles – Brainstorm a raffle of more than one item at various price points. Mention to patients they must be present to win and encourage extra raffle tickets for bringing a friend.
- Deadlines & exceptions – Make sure your special pricing has a deadline to encourage urgency. Consider those who are interested but cannot make it by letting patients book a consult by granting an extension date.
- Encourage Cherry 🍒 pre-approvals before the event – Patients will be primed for easy checkout and booking, and you will know how much they can spend.
- Goodies – Get snacks, cocktails, and decor that align with the event’s theme. Offer gift bags and tease discounts for future treatments leading up to the event.
During the Event
- The client arrives, completes sign-in, and receives goodies. On the sign-in sheet, include: Name, phone number, email, and birthday, a “how did you hear about us/our event?” section.
- Special promotions menu – Offer a one-pager with specials, treatments, pricing overview & photos.
- Live treatments – Get a volunteer/model to receive treatment for observation.
- Experts – Have a product and treatment representative readily available to communicate their expertise on procedures.
- Practice Development Manager – Request your PDM and staff be available to address any payment plan questions and explain to clientele in consult rooms and by a brief presentation in the central area.
- Give attendees the ability to book a consultation – Encourage them to book their time in advance. Have materials for sharing, like before/afters, menus, prices, and treatment info.
- Check out and book an appointment – Highlight Cherry Payment Plans and special offers again. Announce raffle winners at the end of the event.
Post-Event
- Follow up with patients who attended the event – Remind them about special offers and those who RSVP’d but did not come to the event to remind them about special offers.
- Share event highlights on social media and in email.
- Log sign-in info from the event into your database and follow up with a “thank you” for attending, special promotion, birthday outreach, or a future email blast.
- Open the Instagram app
- Tap the [+] icon in the top right corner of your screen
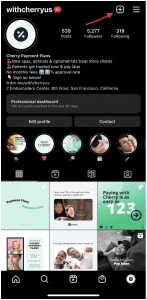
After you click the plus sign in the top-right corner of your screen, you may be prompted with a list of types of posts, select “Post”.
- Choose an image or video from your library
 Instagram will show you photos already saved to your phone. ⭐️Pro tip: Save our social media templates to your phone before this step so you can easily upload them to your profile. Check out our media kit here. Other Post ideas include before/after photos, testimonials, popular treatment price comparisons with Cherry Payment Plans, a team introduction, special promotions, etc.
- Post multiple images or videos at once
Click on the carousel icon that looks like stacked squares on the middle-right side of your screen. Once you tap this, you’ll see a number on the corner of every image or video you tap. This number determines where the content will appear in the carousel. See screenshot above.
- Pick a filter
Instagram offers 24 filters. Scroll to the right to browse your options and click on one to preview how it will look on your photo.
- Type your caption
Write an interesting caption to go with your photo. Text can help optimize your post in Instagram’s search, so writing can only benefit you. ⭐️ Pro tip: Check out our pre-made social media captions here. We invite you to copy and paste it onto your Post.
- Use hashtags
Users can search by hashtags with Instagram’s search feature. So, make sure to write relevant hashtags in your caption. For example, if your post is about laser hair removal treatments, you can hashtag #laserhairremoval #cherrypaymentplans
- Tag friends
Want a friend or another account and their followers to see your photo? Click “Tag People” to tag other Instagram accounts in your post. Try it out with @withCherryUS.
- Add your location
Tap, “Add Location” to put a location on your image, which makes it easier for people to find your Post and visit your location.
- Edit the post
Typos happen to everyone, even the best content creators! If you just posted something and notice a spelling error, rest assured, simply tap the three dots that appear on the right across from your username, then tap “Edit”. Make the adjustments you see fit and be sure to save them so it reflects on your Instagram.
Your post is complete!
Extend your reach, boost engagement, and build your community with Instagram Reels.
Reels are fun, short-form videos to share entertaining, educational, and inspiring content. Similar to TikTok, Reels display in vertical format, and you can record and edit 15 to 90-second clips to trending music and add filters or text.
- Open the Instagram app
- Tap the plus sign icon [+] in the top right corner of the screen and select Reel
You can also start creating a Reel in 2 other ways:
Create a Reel from the Reels tab – Tap into the Reels tab at the middle-bottom of your screen and then hit the camera icon in the top right corner.
Create a Reel from the Instagram Stories camera – Open the Instagram Stories camera, and find the Reels icon positioned on the bottom next to “Story”.
- Record or upload your video clip(s)
Instagram gives you two options to create a Reel
- Press and hold the record button to capture footage
- Upload video footage from your camera roll
If you want to watch, trim, or delete a clip you recorded, tap on “Edit Clips.”

- Edit your Reel
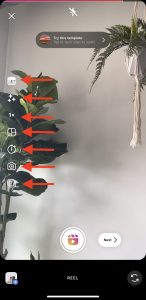 Once you’re done with your recording, you can add text, audio, stickers, and drawings to your Reel using the icons in the editors, all from the Instagram interface!
- Audio – This lets you select audio from the Instagram music library or import it from your device.
- Effects – This lets you add an effect to your Reel.
- Speed – This lets you change the speed of your video or slow it down.
- Layout – This lets you adjust the layout and add more than one recording at a time.
- Timer – This lets you set a timer that will go off before you start recording and set a time limit for the next clip. This is useful if you want to record hands-free.
- Dual – This lets you record videos using your front and rear camera at the same time.
- Align – This appears after you record your first clip. It allows you to line up objects from the previous clip.
- Adjust your Reel’s settings
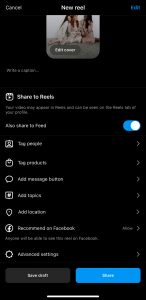
When ready, tap “Next” in the bottom right corner of your screen; you will then be able to:
- Edit your Reel cover
- Add a caption
- Tag people in your Reel
- Add a location
- Enable Facebook recommendations
- Decide whether you want your Reel to be posted to your Instagram feed (and not just the Reels tab on your account).
- Post your Reel
Once complete, tap the blue “Share” button on the bottom of the screen. Congrats! You’ve posted an Instagram Reel
Take your Cherry marketing to the next level.
TikTok dominates social media platforms and is now one of the best places to grow your business. But, if you’re new to the platform, it can feel overwhelming to know where even to start. That’s why we’ve put together this quick-start guide to TikTok.
How to set up your TikTok account
- Download the TikTok app
Go to the App Store or Google Play to download the TikTok app. Once you download the app, you can start watching videos immediately. In order to post a video, you’ll need to create an account.
- Sign up/make an account
When you open the app, you’ll find yourself on the “For You” page (aka TikTok’s homepage). From there, go to the “Me” tab on the lower right-hand side of the screen. Here you’ll be prompted to sign up using your phone number, email address, or pre-existing social media accounts.
- Edit your account
To change your username, tap the icon in the bottom right corner that looks like the silhouette of a person’s upper body. Then hit edit profile. You can change your username to something more unique, as well as add a bio, a profile picture/video, your business category, and more!
How to navigate on TikTok
- The app is divided into two main feeds: For You and Following. For You is an algorithmically generated stream of videos, similar to Instagram’s Explore page.
- Swipe left, and you’ll see the Following feed, which features videos from people you choose to follow.
How to understand icons on TikTok
You’ll notice to the right of every TikTok video; there is a series of icons.
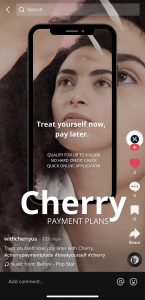
- Top icon/Profile picture → The symbol for the creator who made the video. Clicking this will take you to their profile.
- Heart icon → Functions like a heart on Instagram or Facebook, which means you like the video when you click it.
- Icon with three dots in chat bubble → This is where you can view and post a comment.
- Flag/ribbon icon → Clicking this icon adds the video to your collection of favorites.
- Right pointing arrow icon aka “Share” icon → Gives you access to various ways to share the video with friends and followers.
TikTok is being used daily by businesses to increase brand awareness and attract new customers. Here are some tips for refining your TikTok marketing strategy.
- Post often
By posting often, you can test various types of content and see what is working and what isn’t. Creating different videos to showcase your brand is part of figuring out what appeals to your target audience. By posting consistently, you can collect feedback on what is effective.
- Have a sense of humor
The best way to engage with TikTok users is to have fun and connect through humor. Users on this platform are looking to be entertained. Instead of focusing on video views, have fun creating content, and the audience will follow.
- Have a clear call-to-action
Providing a call-to-action (CTA) is a simple and effective way to generate conversions and is a staple of high-performing advertisements. An example can be “Share this video!”, “Comment your reaction,” “Pre-qualify with Cherry today.”
- Dig into analytics
TikTok analytics are critical to track because they give you an idea of how well your content performs. If you see that a particular video is doing well, you can create something similar for future content. Key engagement metrics to hone in on are video views, profile views, likes, comments, shares, and day of the week.
An Instagram Collab Post is a single post that appears on two different users’ Feeds or Reels at once. They share the same comments, likes, and number of shares.
How it works:
- One user creates the post and then invites the other to be listed as a collaborator. Once the collaborator accepts, the post appears under both users’ accounts.
Why use an Instagram Collab Post:
- When you create a Collab Post, you’re making it easier for users to find and interact with your content. Having your content appear under two profiles can help your brand stay relevant and increase discoverability and engagement.
Here’s how to create an Instagram Collab Post:
- Create a Feed Post or Reel as normal
- Go to the “Tag People” menu
- Click on “Invite a collaborator” (only one per post)
- Type the account you’d like to collaborate with
- Once you post your content, your collaborator will get an invitation in their notifications. Until they accept, your post will appear with only you as the author. Once accepted by the collaborator, it goes live.
How to Add Links to Instagram Stories
Story link stickers are one of the easiest ways to drive traffic to an external destination (like your Cherry pre-approval link!) on Instagram.
- Create an Instagram Story

- Go to the Sticker Tray and click on the “Link” sticker
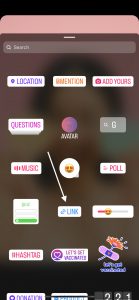
- Paste your link into the field

- Post to your Story!

How to share content on Instagram
Try sharing Cherry’s content to your Story!
Instagram allows you to repost other users’ Reels and Posts to your own Instagram Story using its native functionality.
Re-sharing content (such as Cherry’s) saves you time and effort in creating your own post and helps patients discover your services.
Here’s how to start:
- Navigate to the Post, Reel, or Video you want to share
Remember that you can only repost content from users and brands with public profiles.
- Click the paper airplane icon
On photos, the button will be located next to the Like and Comment buttons on the bottom left-hand side.

On Reels, it will be located between the comment button and three dots on the right-hand side.

- On the popup menu, click “Add to your Story”
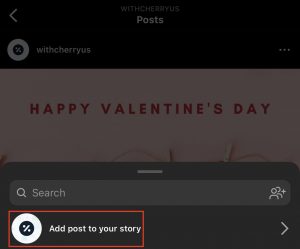
- Go to your profile, and click on [+] in the top right corner of your screen
- Choose a photo, add a caption, hashtags, locations, etc., how you usually do it
- Then, to add music, click on the “Add Music” option
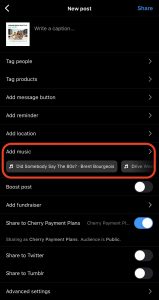
- You can search for songs or browse the “For You” section
- Once you’ve made your choice, select the audio clip you’d like to use
- Then click, “Done”, and “Share”.
It’s that easy!
How to visually differentiate your Instagram Grid
Make each Instagram post part of a bigger picture!
The Instagram grid is an opportunity to showcase your brand and give users a birds-eye view of your posting history.
Having a visually differentiated Instagram grid is an effective way to convert your Instagram viewers into followers.
When we discover an Instagram account, the first thing we do is quickly scroll through it while subconsciously evaluating the bio, number of followers, and how their grid looks.
If the account offers a type of content that interests us in a way we find valuable, we follow them. If not, we don’t.
Here are a couple of ideas to pull inspiration from when deciding your grid aesthetics.
The checkerboard – Cherry’s personal favorite!
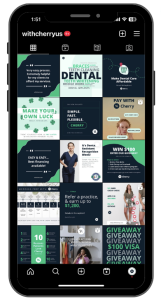
Design row-by-row

Turn your grid into a rainbow

Embrace the border

Tips for maintaining these looks:
- Preview your grid – there are a handful of third-party apps that let you preview your grid before posting
- Keep it consistent
- Make sure it matches your brand
- Take advantage of image editing tools
- Schedule your posts
Timeless Topics for Social Media Videos
TikToks, Reels, Stories, Livestreams – it’s no secret that videos are the name of the game when it comes to getting your audience’s attention. That’s why captivating video content is a game-changer.
Keep your social media videos interesting with these topics:
- Introduce yourself or your practice
- Event lead-ups, updates, or recaps
- Take followers behind the scenes
- Show a patient’s before and after
- Offer tips and tricks about a popular treatment or service
- Show how-to videos e.g. how to apply with Cherry
- Highlight services/treatments
- Spotlight your community or employees
- Create a listicle e.g. 5 tips for treatment aftercare
- Give a sneak peek
- Interview a thought leader
- Say thank you
- Share a day in the life
- Answer FAQs
- Tease upcoming sales/holidays
- New product updates
- Tour your space
- Educational or “how-to” content
- Hop on a trend
Give these a try today!